Thursday, December 31, 2015

SSD January Progressive Freebie image!

Yes, 2016 is here! It's also time for Sassy Studio Designs Facebook Progressive image! Just become a member of the group if you are not already, and tons of inspiration will be coming your way!! Join the fun and enter your card/project with this image and then next month you also can have the next progressive image free!
 
I made a clear shaker card with my new Fuse Tool and Avery Elle storage pockets. I colored the image with Copic markers and ran it, and a same sized piece of white cardstock, through my Xyron 900 to make the back sticky. I cut my storage pocket to size (just cutting off the top/fold-in flap end  -Save this because it is perfect to use for a pocket on the outside of another shaker card--for money or a gift card, and the recipient does not have to cut the card to get it out!! And, the fun card can be reused if so inclined!!)
I placed the plain white piece of cardstock on the outside back of the card. This piece is for the message I want to write. Now I knew where to place my colored image inside the pocket so it would be centered. I just lined it up with the white notecard. Adhering the colored panel inside would also keep all the fun-fetti in front of the image. Lastly, I filled up the card with all my random bits of glitter, beads and sequins, and sealed up the last side. Viola! Party card ready to go!
You have all month to play along!

Thursday, December 17, 2015

SSD Sassy Frozen Sisters

  Hello again! It's time for another Flash Back Friday and today Sassy Studio Designs is featuring Frozen Heart Sassy and Let It Go Sassy!


Gorgeous, right!!          Every Friday the team will provide you with inspiration on a particular image. These are images are ones that may have been forgotten about, or need a little extra lovin!

YOU CAN GET THESE IMAGES FOR FREE! All you have to do is join the SSD Facebook Fan Page and it will be available for you to download for 24 hours ONLY!
 
(If you miss this opportunity, go to the Sassy Studio Designs Store and scroll through the fan-art section. There are several variations and a lot of other amazing images to choose from, at the regular prices.)
 The DT has put together some fabulous inspiration for you. Check SSD's blog to see their makes!! (Also, every Thursday is a challenge and a chance to win some digital images- and there's the monthly progressive challenge on Facebook! Come play!)
 
Thanks for staying so long, and I hope you like my "Let It Go Sassy" card!
 
   The background was a fun, and fairly fast one to make: I used Shabby Blue Frantage embossing powder on my background stamped image of snowflakes. Have you used Frantage? I love the look of it and always want to use it, but then it never looks quite right.... It is really chunky, comes in some different colors and usually has some glitter and gold EP chunks in it too. I wasn't too sure how it would stick, but my snowflakes were kinda chunky too, so I tried it. I am happy with the result.(Compare the background large snowflakes to the random other gold and white chunks; a lot of the snowflake chunks did not stick). Mostly, the blue glitter stayed on the image with a little bit of white, and a little less gold. **Next I took a little clear embossing powder and dumped it over the snowflakes, because I wanted these images to be solid.** Oh, if you haven't used Frantage, heat from underneath first, otherwise all the chunks blow off your paper!! Then I stamped, with a light blue-green ink another snowy background stamp, where the snow is solid circles. Then I wiped the extra ink off the already embossed large snowflakes and inked around the edge of the card; keeping the center a little lighter for focus. I wanted more gold to show up, so then I sprinkled some gold and white Frantage randomly around.
I cut out my Sassy image and a snowy hill and was all set! The bottom of the image is glued directly onto the snowy hill and the center and top of the image is raised with pop dots!
     Let It Go Sassy is colored with Copic markers: Skin E04, E11, E21, E00, R20. Dress: B0000, BG000, B00, BG01, B02, BG05. Eyes: BG05, B000, 100, W5, Sharpie XF white poster paint dot for the highlight in the eyes. Hair: E51, E53, E55, Wink of Stella Gold pen for more sparkle. On this photo, it shows up as the darkest hair color.
     Thanks for hanging on until the end, now hurry and join the FB page and get these freebies while you can!

Wednesday, December 16, 2015

{DTBST #312} Tis The Season

Okay... The challenge is to use the colors of Christmas; red, gold, silver and green. We all needed a change of pace from all the holiday cards, right?!
 
This image was from a Flash-Back Friday! Sorry, it isn't in the shop right now, but there are a ton of other fantastic images; and every Friday SSD Facebook page has a fabulous image free for 24 hours!
 
Copic colors: Red R59, R46, R17. Green G28, G99, G94. Gold Y28, Y26, Y11. Brown E29, E59, E25. Sand E40, E42, E43. Boots 110, C9, C7, C5. Skulls E53, E51. Water BG57, BG53, B00, BG000, B0000. Skin E04, E11, E21, E00, R21. Hair E57, E55, E53. The sky is colored with watercolors and the word Pirate and the metal elements were covered with Wink of Stella. Perfect pearls was added to the pearls for dimension.
 
Hope you will join the fun and give it a go. You don't need to use a SSD image to play along, but we love it when you do. Enter by next Wednesday night for your chance to win 2 SSD images of your choice.

There is some extra incentive for using a SSD image, 
you get to enter twice. So if you use one, make sure you
 link to your blog post and the second link can just be to your blog 
(it won't let you link to the same post twice). After your name, please put SSD, so we know why you are linking twice!

Saturday, December 12, 2015

It's Release Day for Sassy Studio Designs!

Just in time, before the big movie release! I am a guest designer for Sassy Studio Designs, and am loving all the inspiration I am finding! Who is your favorite character? I admit that I have not seen a whole Star Wars movie!! (I'm going to have to watch a marathon of them and get caught up!)  I did know who Han Solo and Space Princess Honey were, and made my card with them combined!
 Image colored with Copic markers and placed onto a watercolored panel. The sky texture was made with salt. a-lot-of-salt. I wet the surface, placed on some color, sprinkled heavily with Kosher salt, spritzed on more water, and waited for it to dry. LOL right, after 20 min I used my heat gun! It wasn't giving me the look I wanted so I carefully placed another wet layer of blue watercolor, trying not to move the salt around. I wasn't sure if it would work, but I was hoping the colorful first layer would stay colorful under the salt. Then I put a little more salt on and repeated the same drying process! ;)
-Whoops, I bent HanSolo's neck when placing on the card....
 
You should have arrived from GDT Jessica's blog; or to start at the beginning of the hop go to SSD's blog.  The next stop is GDT Suzi's blog. Thanks for taking the time to hop with us, and I appreciate your comments! (This is the very first time I have EVER been on this side of a hop before!) {Hugs!}

Blog Hop Order:
SSD: http://sassystudiodesigns.blogspot.com/
Kim -http://itsallaboutcrafting.blogspot.com/
Samantha – http://designsbysammy.blogspot.co.uk/
Judy - http://jvzcreations.blogspot.com/
Greg - http://latestwhims.blogspot.com/
Jo D – http://www.helpyoufindit.blogspot.co.uk/
Kel – http://scrap-photograffs.com/
Chris - http://cattsscratchingpost.blogspot.ca/
Kitty – http://intruderlady.blogspot.com/
Rachelle – http://www.imblackmartha.blogspot.com/
Cindy - http://cre8ivecindy.blogspot.com/
Carrie - http://carrieshandmadecards.blogspot.co.uk/
GDT Judy Rogers - http://craftygirlcardsandcrafts.blogspot.com/
GDT Sheri Scraps - http://mammasscrappin1.blogspot.com/
GDT Jessica - http://cardsbyjessi.blogspot.fi/
GDT Jeannean - http://papercraftingnean.blogspot.com/
GDT Suzi - http://suzannebakermckenzie.blogspot.com/
GDT Art Jypsy - http://ajcreativeenergy.blogspot.com/
GDT Ema - ema-gination.com
GDT Shelley - http://tolepainter13.blogspot.ca/
GDT Karen - http://busyinspirations.blogspot.com/
SSD Store http://buysassystudiodesigns.blogspot.com/


Party Chat Link:
http://ssdpartyblog.blogspot.com/
Chat: 6:00 PST to 8:00 PST

Friday, December 11, 2015

Don't Open Until Christmas!

{New Release Teaser in post below.}
Every Friday the team will provide you with inspiration on a particular image. These images are ones that may have been forgotten about, or need a little extra lovin!
YOU CAN GET THIS IMAGE FOR FREE! All you have to do is join the SSD Facebook Fan Page and it will be available for you to download for 24 hours ONLY!  Hurry and grab this one because it is not in the shop!!
The design team has put together some fabulous inspiration for you. Go to the Sassy Studio Designs Blog page to see everyone's great ideas!   Here's my card:
 
 
 This image is colored with Copics: Skin E04, E11, E21, E00, R20. Lips RV34, RV32, E04. Shirt/socks BG09, BG07, BG05. Pants W09, W07, W05; C07, C05, C03. Present B05, B02, B00; RV29, R27, R22. Wink of Stella-Clear- was used on the ribbon, socks, and a dab on her eyes; oh, also over the words.
The image panel is popped up at the bottom and a scrap of previous years SU! Christmas papers placed under. The top of the image panel is flat against the base.


Thursday, December 10, 2015

Sassy Studio Designs Release Teaser! *Day5!

Good Morning Sassy Fans!!!! Well, the wait is finally over!!!! As always, there is excitement building around Sassy Studios and the Design Team has been working really hard to make another round of Sassy creations that are OUT OF THIS WORLD!
BEFORE I show you the teasers, I want to explain how our NEW PRIZE system works. THREE chances to win......ready???

 i) For each day there is a teaser, you are to GUESS what you think each image is going to be (be specific!!). You must guess ON the teaser post of the SSD blog. For the 5 days of teasers, ONE WINNER who guessed the most correctly will win the ENTIRE collection!!!
 
ii) FOUR lucky BLOG HOP participants from 4 RANDOMLY CHOSEN DT blogs will win 1 image of their choice.
 
iii) Grand Prize winner at the END of the HOP will win the entire collection.


Stay tuned EVERY DAY THIS WEEK for more teasers!!! AND then, be sure to come back SATURDAY, Dec. 12 to participate in our New Release BLOG HOP!!!! You will have fun, get lots of inspiration and have a chance to win some great prizes!!!!
It's a collection that is OUT OF THIS WORLD, you won't want to miss it!!!!
AND at 6 pm PST, come join us at the Party Chat and have a few laughs with the DT & other members! You never know when FREEBIES will pop up!!!  
Shine up those hopping shoes, do your stretches, and hydrate!!! AND stay tuned tomorrow for more TEASERS!!!!

Thanks again to our little brother Greg for the teasers - he's pretty talented eh?!?!

Wednesday, December 9, 2015

Sassy Studio Designs Relase Teasers! *Day4!


Good Morning Sassy Fans!!!! Well, the wait is finally over!!!! As always, there is excitement building around Sassy Studios and the Design Team has been working really hard to make another round of Sassy creations that are OUT OF THIS WORLD!
BEFORE I show you the teasers, I want to explain how our NEW PRIZE system works. THREE chances to win......ready???

 i) For each day there is a teaser, you are to GUESS what you think each image is going to be (be specific!!). You must guess ON the teaser post of the SSD blog. For the 5 days of teasers, ONE WINNER who guessed the most correctly will win the ENTIRE collection!!!
 
ii) FOUR lucky BLOG HOP participants from 4 RANDOMLY CHOSEN DT blogs will win 1 image of their choice.
 
iii) Grand Prize winner at the END of the HOP will win the entire collection.


Stay tuned EVERY DAY THIS WEEK for more teasers!!! AND then, be sure to come back SATURDAY, Dec. 12 to participate in our New Release BLOG HOP!!!! You will have fun, get lots of inspiration and have a chance to win some great prizes!!!!
It's a collection that is OUT OF THIS WORLD, you won't want to miss it!!!!
AND at 6 pm PST, come join us at the Party Chat and have a few laughs with the DT & other members! You never know when FREEBIES will pop up!!!  
Shine up those hopping shoes, do your stretches, and hydrate!!! AND stay tuned tomorrow for more TEASERS!!!!

Thanks again to our little brother Greg for the teasers - he's pretty talented eh?!?!
 

Tuesday, December 8, 2015

Sassy Studio Designs Release Teaser! *Day 3!

Good Morning Sassy Fans!!!! Well, the wait is finally over!!!! As always, there is excitement building around Sassy Studios and the Design Team has been working really hard to make another round of Sassy creations that are OUT OF THIS WORLD!
BEFORE I show you the teasers, I want to explain how our NEW PRIZE system works. THREE chances to win......ready???

 i) For each day there is a teaser, you are to GUESS what you think each image is going to be (be specific!!). You must guess ON the teaser post of the SSD blog. For the 5 days of teasers, ONE WINNER who guessed the most correctly will win the ENTIRE collection!!!
 
ii) FOUR lucky BLOG HOP participants from 4 RANDOMLY CHOSEN DT blogs will win 1 image of their choice.
 
iii) Grand Prize winner at the END of the HOP will win the entire collection.


Stay tuned EVERY DAY THIS WEEK for more teasers!!! AND then, be sure to come back SATURDAY, Dec. 12 to participate in our New Release BLOG HOP!!!! You will have fun, get lots of inspiration and have a chance to win some great prizes!!!!
It's a collection that is OUT OF THIS WORLD, you won't want to miss it!!!!
AND at 6 pm PST, come join us at the Party Chat and have a few laughs with the DT & other members! You never know when FREEBIES will pop up!!!  
Shine up those hopping shoes, do your stretches, and hydrate!!! AND stay tuned tomorrow for more TEASERS!!!!

Thanks again to our little brother Greg for the teasers - he's pretty talented eh?!?!

Monday, December 7, 2015

Sassy Studio Designs Release Teaser! *Day 2!

Good Morning Sassy Fans!!!! Well, the wait is finally over!!!! As always, there is excitement building around Sassy Studios and the Design Team has been working really hard to make another round of Sassy creations that are OUT OF THIS WORLD!
BEFORE I show you the teasers, I want to explain how our NEW PRIZE system works. THREE chances to win......ready???

 i) For each day there is a teaser, you are to GUESS what you think each image is going to be (be specific!!). You must guess ON the teaser post of the SSD blog. For the 5 days of teasers, ONE WINNER who guessed the most correctly will win the ENTIRE collection!!!
 
ii) FOUR lucky BLOG HOP participants from 4 RANDOMLY CHOSEN DT blogs will win 1 image of their choice.
 
iii) Grand Prize winner at the END of the HOP will win the entire collection.
 
  
Stay tuned EVERY DAY THIS WEEK for more teasers!!! AND then, be sure to come back SATURDAY, Dec. 12 to participate in our New Release BLOG HOP!!!! You will have fun, get lots of inspiration and have a chance to win some great prizes!!!!
It's a collection that is OUT OF THIS WORLD, you won't want to miss it!!!!
AND at 6 pm PST, come join us at the Party Chat and have a few laughs with the DT & other members! You never know when FREEBIES will pop up!!!  
Shine up those hopping shoes, do your stretches, and hydrate!!! AND stay tuned tomorrow for more TEASERS!!!!

Thanks again to our little brother Greg for the teasers - he's pretty talented eh?!?!

Sunday, December 6, 2015

Sassy Studio Designs Release Teaser! *Day 1!


Good Morning Sassy Fans!!!! Well, the wait is finally over!!!! As always, there is excitement building around Sassy Studios and the Design Team has been working really hard to make another round of Sassy creations that are OUT OF THIS WORLD!
BEFORE I show you the teasers, I want to explain how our NEW PRIZE system works. THREE chances to win......ready???

 i) For each day there is a teaser, you are to GUESS what you think each image is going to be (be specific!!). You must guess ON the teaser post of the SSD blog. For the 5 days of teasers, ONE WINNER who guessed the most correctly will win the ENTIRE collection!!!
 
ii) FOUR lucky BLOG HOP participants from 4 RANDOMLY CHOSEN DT blogs will win 1 image of their choice.
 
iii) Grand Prize winner at the END of the HOP will win the entire collection.


Stay tuned EVERY DAY THIS WEEK for more teasers!!! AND then, be sure to come back SATURDAY, Dec. 12 to participate in our New Release BLOG HOP!!!! You will have fun, get lots of inspiration and have a chance to win some great prizes!!!!
It's a collection that is OUT OF THIS WORLD, you won't want to miss it!!!!
AND at 6 pm PST, come join us at the Party Chat and have a few laughs with the DT & other members! You never know when FREEBIES will pop up!!!  
Shine up those hopping shoes, do your stretches, and hydrate!!! AND stay tuned tomorrow for more TEASERS!!!!

Thanks again to our little brother Greg for the teasers - he's pretty talented eh?!?!


Wednesday, December 2, 2015

Merry Christmas Sassy Style!

My term as a Guest Designer for Sassy Studio Designs has been extended, and I have a couple "Secret Santa" makes for you today!
DTBST (Dare To Be Sassy Thursday) Challenge #310- Anything but a card, and I have used Santa Pinup Sassy Image, cropped, for my shaker gift tag.

 The front and inside "polaroid photo frames" are made with a Stampin' Up! die; one cut on shimmery paper for the front panel and regular cardstock for the inside. Another photo frame was cut from fun-foam to give the sequins room to shake-shake! The card base was cut twice as long and just as tall as one frame, and the center was cut out of the front panel of the base. Two acetate pieces were cut from some leftover packaging. Sequins and chunky glitter were put between the layers of acetate with the image over the acetate, just under the shimmery photo frame. The image was cropped and colored with Copics:
 Red: R22, R27, RV29. Hair/eyes: E57, E55, E53, W5, 100. Santa Sack: E31, E33. White trim: W3, W1, 0 Blender dotted over. Earring/rope: Y26, Y28.
 This is also the image for this months Facebook Progressive Challenge, and you can get the image free for the month! Simple rules to play along and great images! This card was made similar to the gift tag; just a piece of vellum instead of a shaker box!


Friday, November 20, 2015

Sending a Smile 4 Kids!

It's time for another sponsorship from Sassy Studio Designs, and this time there is a fun 2-week anything goes- link up! As an added perk, we can donate our age-appropriate handmade cards, and they will be delivered to children in hospitals so they can have cards to give out. There are a few simple guidelines to follow if you want to donate, and they can be checked out in the tab on the Send A Smile 4 Kids Challenge Blog.
I think this is an image any teen could love! She can be found in the shop, under the teen category, here; just scroll down through the images.

I used Copics and the colors are as follows: SKIN: E000, E04, E31, E11, E00, R11. LIPS: RV34, RV32. EYES: BV17, B12, 100, Sharpie XF white poster paint pen. HAIR: E35, E47, E53. JEANS: B12, B23, B37. SHIRTS: BV17, BV13, BV02, BV31; V28, BV23. I also used MFT Blueprints 15 for the stitched background die and the two flag dies.
Thanks for looking, and I hope you will consider playing, and/or checking out this blog because it is a good cause!


Thursday, November 12, 2015

Pocahantas Honey- Flashback Friday Freebie image

Every Friday the Sassy Studio Designs team will provide you with inspiration on a particular image. These images are ones that may have been forgotten about, or need a little extra lovin!

YOU CAN GET THIS IMAGE FOR FREE! All you have to do is join the SSD Facebook Fan Page and it will be available for you to download for 24 hours ONLY!
If you miss out on this opportunity, you can still purchase this image from the shop. Just scroll down this section. She is great for Thanksgiving and Thank you notes!
This one I went a little simpler with my coloring style and really enjoyed it! I masked my image first. Then stamped the stalk of corn from an old (retired) Stampin' Up! set, repeatedly, using distress inks I had smooshed out onto a palate. I then, lightly and quickly, colored in the corn field with the remaining ink on my palate. The sky was also colored using distress inks. The colors are a little more vivid in real life, but I couldn't get it to photograph properly. -oh, I didn't use watercolor paper, so I was trying to be real careful to use as little water as possible. Mini Pad Distress Ink colors: fossilized amber, mowed lawn, brushed corduroy, milled lavender and shaded lilac. I used my heat gun to help dry the paper and then left it under a heavy pile of papers to flatten out overnight. It was ready to go when I got to it the next morning!
The image is colored with Copic markers: Skin: E23, E11, lips: E04. Dress: E53, E33. Necklace: BG45. Hair and eyes: E77, E71. I also use a black or very dark grey Copic to go over the eyelashes, and a Sharpie XF white paint pen to make a dot of light. I think both these things really help the eye to draw attention! (A black multiliner would also be a good choice, and have a fine tip.)
The word is a die from Savvy Dies and I cute it 3 x; twice to build up under the card and the 3rd time right out of my card front, which I then layered on top. This makes it pop a little more too.
Thanks for checking out my blog, and I hope you will also check out all the awesomely cute and sassy images, and challenges, available from Sassy Studio Designs. I've really enjoyed being a guest designer for them this month!
 

Wednesday, November 11, 2015

Sassy Studio Designs Colors of Autumn {DTBST#307}

This Thursday the challenge is to use red, gold, green, orange, and brown on your card--which are not my normal go-to colors! This challenge was a step outside for me (haha, no pun intended!) but I am loving how this came out--all because of this awesome challenge!
This image can be found in this section of the shop; just scroll down. She is called Buttercream Babe-Sassy Cake!
Copic marker colors used are: SKIN: E000, E04, E11, E21, E00. LIPS: E08. EYES: E59, E35, YR27, sharpie XF white paint pen. HAIR: E49, E35, YR27. CAKE: E55, E53, E51, E18, E08, YR27.GLOVES/RIBBON: YG91, G94, G99. BACKGROUND: YR61, YR00, E000. The frosting trim is colored YG91 and then covered with Gold Wink of Stella for a little shimmer. The gold on the pattern paper mat (super shiny and reflective) is from DCWV-Gilded Stack.
Dies that were used were Memory Box Stitched Rectangle layers 30009 and MFT Blueprint 13.
Thanks for checking out my post and come play with SSD this week,
come on--it's Dare To Be Sassy Thursday!!
 
 
Hope you will join the fun and give it a go. You don't need to use a SSD image to play along, but we love it when you do. Enter by next Wednesday night for your chance to win 2 SSD images of your choice.

There is some extra incentive for using a SSD image, 
you get to enter twice. So if you use one, make sure you
 link to your blog post and the second link can just be to your blog 
(it won't let you link to the same post twice). After your name, please put SSD, so we know why you are linking twice!


Saturday, November 7, 2015

Outlaws Challenge-Christmas

This week Sassy Studio Designs is sponsoring Outlawz Challenges and the theme is Christmas.
 
 The digital image I used can be found here in this section of the shop. She's called; Hanging The Wreath, and I think she is perfect to use all winter long-totally a holiday image that can be dressed up or down!
 
  I am lucky enough to have won a spot as a guest design team member with Sassy Studio Designs for the month, and I colored up this image with Copic markers. SKIN:  E04, E11, E21, E00, R20. LIPS: RV99, R56. EYES: B23, B32, W5, W9. HAIR: E55, R53, E51. SHIRT/BOOTS: E77, E74, E71, E70, E49. PANTS: W9, W7, W5. WREATH: R59, R46, R35, YG25, YG67, G28. (I've found new favorite combos for a red and a green!)
 
 The background was made by first lightly covering the card with Stamping Up! Soft Sky ink and then taking a scrap edge of paper and sponging Ballet Blue ink off it. The darker edge of the 'sun ray' is against the edge of the scrap paper and it fades lighter as it is sponged off the scrap. I just made a dot off the edge of my card and made sure to keep one edge of my scrap paper always on it so the 'rays' would look like they were coming from a central point.
 
 I also used a staircase die from Memory Box and Landscape Borders from W+9 for the snowy drifts. The words are from a sentiment set at Kraftin Kimmie Stamps, and is stamped with SU! Ballet Blue ink.
 Thanks for looking and if you'd like, you can follow me on  e-mail or Bloglovin by clicking the button at the top left, or if you are on Instagram, you can find me there!


Friday, November 6, 2015

Holiday Pie! Sassy Studio Designs style!

Every Friday the team provides you with inspiration on a particular image. These are images are ones that may have been forgotten about, or need a little extra lovin! (This month I was chosen to be a guest designer through the monthly progressive challenge.)

This image will ONLY be available for FREE for 24 hours! Since this is a retired image, make sure you grab her before she's gone for good! All you have to do is join the SSD Facebook Fan Page and it will be available for you to download for 24 hours ONLY!

Today's image is called Holiday Pie, and this is the card I made with it. The pattern paper is from a garage sale and I colored the image to match with Copic markers. Half of a vellum doily finishes off my card.
Here's a close up, trying to catch some of the Wink of Stella sparkle I added to her jewelry.
 
Thanks for looking, and I hope I have inspired you to grab this freebie (quick) and bake up some Holiday magic with her!


Wednesday, November 4, 2015

Sassy Studio Designs November Progressive Challenge

Wow! Can you believe it, I was chosen to be a guest on the design team for Sassy Studio Designs for the month of November!! It was all because of the October Progressive Challenge on Facebook. Come play, it's fun!
If this is the first month you join, the image is totally free, and continues to be free as long as you play each month. We have a whole month to make a project and post to Facebook. Then you can also have a chance to become the next guest designer too!
This month the image is Princess Feathers Portrait, and she's perfect for this time of year!


Here's a side view to see all the dimension in this We-R-Memory Keepers embossing folder.
 
 
The background was made with Mini Distress Inks smeared directly onto the paper, then spritzed and dripped with water. After I dried it a little I smeared on a touch more ink -direct from the pad onto the paper- and spritzed with a fine water mist to help blend the colors. Then I dried the sheet, stamped my sentiments (a multi-sentiment pack from Kraftin Kimmie Stamps) and ran the paper through the embossing folder.
 
The image is colored with Copic markers and I found a couple new color combos I really like!
Hair: 100, E49, E77, E23.   Skin: E04, E23, E11, E53 with lips E08, E04. Eyes: E77 YR27, W5, 100.  The blue colors are from: BG34, BG15, BG11, BG10. 
 
Thanks for looking and I hope you'll check out Sassy Studio Designs Progressive Challenge!

Saturday, October 17, 2015

Halloween-ish Cards 2015

A couple weeks ago I made up some cards with some of the super-cute Halloween-type Images I had purchased. Here's a quick look at the cards I made.

These three cards are made with digital images from Saturated Canary. The words are from Create With TLC.


This card is from Mo's Digital Pencil and I just love his little monster face!!

 
This last card is also a digital stamp and it is from Faery Ink. She has some of the prettiest people!

Thanks for looking, and hopefully I have inspired you to get crafty!

Hello ODDtober 2015!

Some Odd Girl Stamps is having their ODDtober fest this month. This week I entered some challenges on their Facebook site. Here are my submissions:

Birthday card with nontraditional image. (I also made a "punny" sentiment to go along!) -Open 'til 10/28/2015!
 Black/Orange/Purple Challenge-Open 'till 10/21/2015 (This is great because I colored up a new-to-me image and made a birthday card for next week!)


Keep it Simple Challenge-Open 'till 10/28/2015.
 
 
There's more challenges and time to enter! Go check out the Facebook page! Thanks for looking at my entries!

Simply Betty Zombie Challenges

Last week Simply B Stamps had a Facebook challenge where you received the first image free. When you make a project/card or color that image, you can receive the second image; and so on. The only other stipulation was to also post it on your social media. I previously posted on Instagram and my Facebook page. The challenges are closed now, but here are pictures of the cards I created!
Challenge 1

Challenge 2

Challenge 3

Challenge 4


Challenge 5
 
Challenge 6

Thanks for looking at my zombies; I still like them to look sorta' cute! LOL!!


Saturday, October 3, 2015

Hello Birthday Ghoul!

Here's my card made with the freebie image from Sassy Studio Designs Facebook October Progressive Challenge! This is Buttercream Babe and she is the perfect image for October Birthdays!
 
The layout is inspired from a sketch by CAS(E) this sketch #143.
I colored the image with Copic markers. The background was made with Distress Ink and a homemade cloud stencil. The words are from Lawn Fawn's Milo's alphabet and highlighted with an Atyou Spica turquoise pen, as well as the teal in her hair. There are also golden highlights in her hair from a Wink of Stella pen and clear Wink of Stella pen on the spider web. Here's a photo that shows some sparkle, but is out of focus otherwise...
Thanks for looking and I hope I have inspired you in some way with my card!
 

Friday, September 18, 2015

Faery Ink -Anything Goes- September Challenge

Who can pass up this cute fall fairy!?    Not me!
 
 
She's a digital stamp from Faery Ink and can be found here!* I wanted her to look like fall and pumpkins, but I couldn't decide what color to do where! So, I used all the colors on her dress! She is colored with Copic markers. The "O" word rubber stamp is from an alphabet set from Stampin' Up!, and the papers were from my stash!. The layout is from My Favorite Things Blueprints 15. Hope you like her, thanks for checking out my post!

Tuesday, September 15, 2015

Santa's Favorites

I wasn't able to get a great photo today, but this Jingle all the way stamp and die set is one that has been on my wish list for a long time! It is super cute! I had a left over ivory and mossy green papers that I'd used in reverse on another card I thought would be a cool and different background for snow and sky. These papers were cut with this die-namics set.  The snowy background was stamped with opaque white pigment ink and the Snowfall red-rubber background stamp.  These images were colored with Copic markers. I'm entering this card into the My Favorite Things Card Design Superstar Challenge. Thanks for coming to check it out!

Sunday, June 7, 2015

Some Odd Girl Comunity Crop Challenges

Well, the deadline for entries is over, so I am placing my projects into one post for you to check out. There were several challenges to enter on the Some Odd Girl Facebook page; each of which got my mojo flowing in different ways. However, I didn't make it into every challenge, but one of them I did do twice!!

This was for the Critter challenge, using digital Toby and Buddie Frog. Sorry, I don't see it in the shop anymore! I didn't realize it was discontinued. There are several other super-cute Toby images though!   This was colored with Copic markers and Buddie was popped up for more dimension. The background paper is something I found in my stash and the paper ric-rack I cut from my Cricut machine. Three colored brads add a little more interest on the upper right. I can just hear Toby saying, "Here mom, this is for You!"
 
This was for the Summer fun challenge with summer colors or theme. These clear images are from the Beach Mae set. I just love his glasses!! They are covered with dimensional glaze for some shine. We have seagulls out at the lake near our house, so this screamed summer to me. I also used coordinating papers to make it look like a sunset. Copic markers were used, and I put the cutting die back over the seagull-circle and sponged around the seagull with ink. I taped the three colored strips of background papers together-with this little space in between- and die cut a larger circle so I could have the black background peeking through. The colored accents were Perler beads that I cut in half and melted in the oven. (Long project, but the outcome seemed to be fine.) These seemed to not distract from the image and sentiment, but give the card the extra punch it needed.

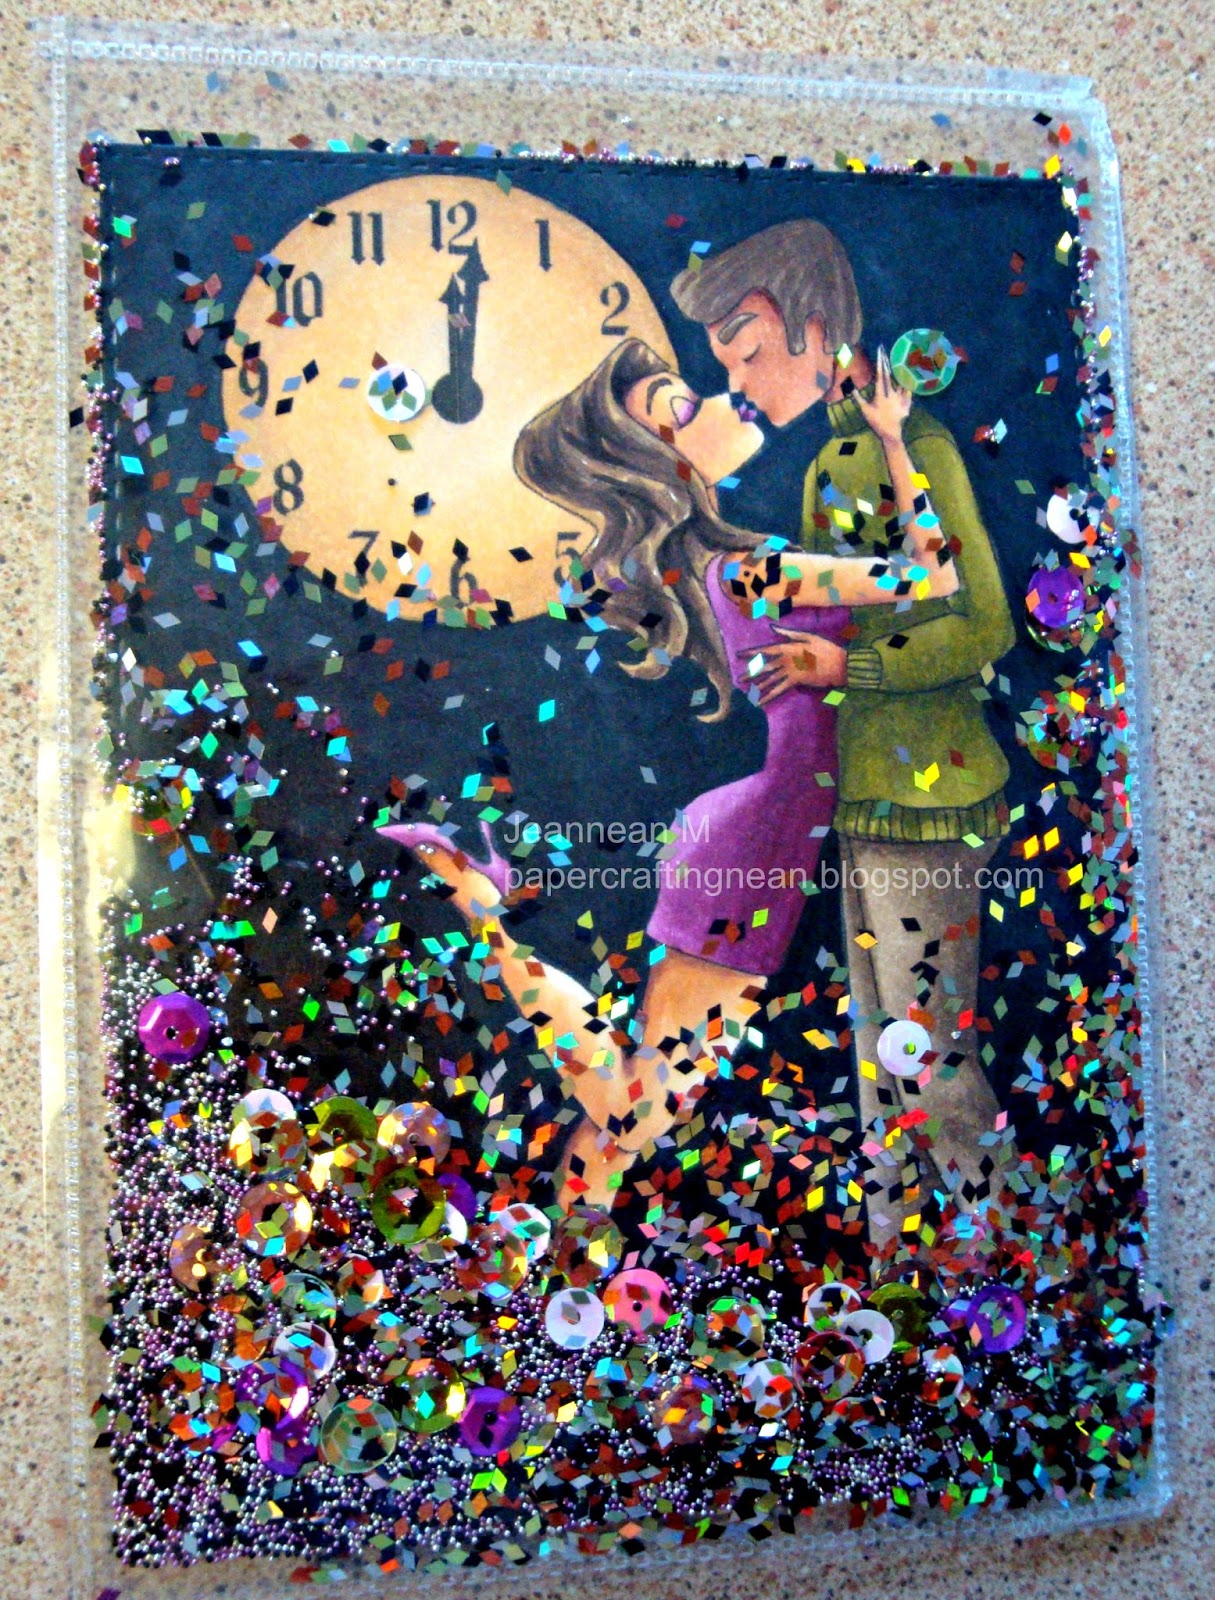
Next up was the Summer Fun Challenge; colorful background using watercolors or mists! I've always loved the look others have achieved with the white embossing on the image, so this was the perfect chance to give it a go! This is a clear set called Threshold Mae.  This couple is popped up off the card. I got out actual watercolors and paper and did the whole card-except for the background piece of the card that has congratulations stamped on it. Originally I was going to use it for the card base, but then it would not lie flat in the end. It was trimmed and glued flat to a new card base. This background also has a stencil with circular, falling snow that I used white pigment ink on to add more interest. I think the white emboss/H2O paint combination is an interesting technique, and maybe I could get better with more practice!


 My last two entries were into the Recipe Challenge: 1 – incorporate a GRID into your project somehow      2 – use a technique! anything that alters another thing in some way (think dry/heat embossing, resist, stencils, painting, masking, quilling, paper folding, tea dyeing, paper piecing, etc…)       3 – combine 2 or more fonts to create a sentiment.
 This one was a little trickier! It ended up being my favorite one though! Fighter Gwen digital stamp is used above; colored with Copics and popped up. I debossed stars from an embossing folder, stamped some random stars above and sponged on some ink around the edges for subtle shading. I also used a stencil with dots on the lower half of the card. I figured between the debossed stars and the dots; there must be some kind of grid! The string is multicolored from my stash of bracelet-making days. The words are digital from CreateWithTLC.

 Below is my entry with Mad Scientist Toby. I love this image! What a great EUREKA moment he looks to be having!! The sentiment is again from CreateWith TLC. Image is colored with Copics. I colored a little reflection of the green on his goggles, skin and lab coat, but the camera did not pick that subtle hint up too well. I used a ledger embossing folder on the right side of the card. I masked Toby and used a grid stamp that I believe is an old one from The Angel Company. Then I got out some Ranger paint daubers and sprays. I haven't played around too much with these, but they were really fun!!


Thank you if you made it all the way to the end! I hope I was able to give you some inspiration too!